Monday 23 May 2016

WEEK 14


This is important week as this week is FYP 2 presentation day. It being held at Gemilang Hall and start at 9.00 a.m until 12.00 p.m. The students is being advise to attend early at 8.30 a.m  for registration and set up the booth. The poster and the project is been set up. The assessor for the FYP 2 are Prof. Dr. Air Abas and Madam Azliza Arshad. The presentation is finished at 11.20 a.m.     

Figure 1: Poster Design

Figure 2: FYP Presentation Day

Figure 1: Micromouse


WEEK 13


There is a problem occured when all the circuit, microcontroller and motor is connected together. The motors is not moving accordingly. After the troubleshooting, the problem is still arise again. The supply voltage is been checked on motor driver`out of fear lacking voltage. However, there is no problem on the lack of voltage. When using only one motor, there is no problem arise but when the two motor is been installed together there is no movement of motor. Even the motor driver is not working even though the voltage is enough to operate them.

Figure 1: View of the micromouse

Figure 2: Trouble shooting on the motor driver

Figure 3: Complete construct of micromouse

Figure 4: Front view

Figure 5: Side view


Sunday 22 May 2016

WEEK 12


After changing the coding and using 7.4V lithium ion battery, the improvement of motor speed rotation is very impressive. The low speed of motor before probably because of low input voltage. However the speed is a bit slow than expected even though the stepper motor is slower than other 2 types of motor that are servo motor and DC motor.


Coding:


WEEK 11


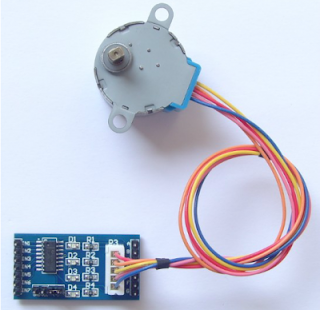
Now its time to test the stepper motor. Stepper motor is connected to the motor driver ULN2003 as figure below.

Then the motor driver is connected to the microcontroller. From the testing result, the speed of rotation motor is very slow.


WEEK 10


The sensor circuit is tested for distance measurement. The IR sensor can detect the obstacle from a range 2cm to 30cm. To get the result the output voltage of sensor is measured.


Result:
Table 1

As shown on the table above, the voltage increase as the distance is increase. However at some point of the distance it will decrease again.


WEEK 9


This week, the continuity test for the sensor circuit have been conduct. The connection of the soldering component was check to ensure that there is no short circuit or open circuit follow by the design of this project circuit.


Saturday 21 May 2016

WEEK 8


For continuation of the hardware development, the circuit for the sensor have been designed. The sensor that I used is infrared (IR) sensor. I used 2 sensor which is on the front right and front left. The sensor will be cover the front view and the side view. There is also variable resistor to control the length of distance between the sensor and obstacle or wall. The sensor provide the detection range between 5cm to 20cm. 


It is the same principle in all Infra-Red proximity sensors. The basic idea is to send infra red light through IR-LEDs, which is then reflected by any object in front of the sensor. Then all it have to do is to pick-up the reflected IR light. For detecting the reflected IR light another IR-LED is going to be use to detect the IR light that was emitted from another led of the exact same type. This is an electrical property of Light Emitting Diodes (LEDs) which is the fact that a LED produce a voltage difference across its leads when it is subjected to light.

Circuit of IR sensor


WEEK 7


There is workshop for the FYP 2 student that is called Final Report Writing Workshop that being held at TTL1. This workshop will teach student how to make a good report by understanding the writing task of the project, formulate the project statement and examine the contraction of your project.

The final report should have:

  1. Introduction
  2. Objective
  3. Methodology
  4. Result
  5. Recomendation
  6. Coclusion


WEEK 6


For chassis of robot, there are many design and different type of chassis which include the bigger one to the small one. The design of chassis is up to your creativity to implement the design you one and for me the scale of robot is on medium size. The chassis of my robot is a round shape with only 2 wheel tires and 2 small tires for the movement. Figure below is my chassis robot that I used to make a micromouse.

Figure 1: View from the top

Figure 2: view of the bottom base


WEEK 5


FYP 2 briefing is being held on Wednesday at TTL1 on 3.00 p.m to 5.00 p.m. The lecture explain about the format for the FYP poster. The poster must contain:

  • Objective
  • Project description
  • Methodology
  • Flow chart
  • Result
  • Conclusion
  • References

WEEK 4


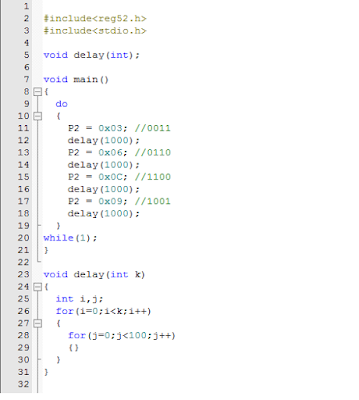
The continuation of simulation of stepper motor with different coding. For the first one is the full drive simulation. Full drive simulation is 90° step movement.


The coding


The other one is wave drive simulation


Coding for wave drive


WEEK 3


This week, the unipolar stepper motor will be test by design a circuit diagram and simulate the motor with coding that been made. The testing is made with half drive coding which mean the motor is moving on step by step of 45°.


The video of simulation


the coding for the half drive


Monday 9 May 2016

WEEK 2


There some changes on component and equipment especially on the motor driver and motor. For the motor driver I will used ULN2003 Stepper Motor than the original that I have planned. Also for the stepper motor I’m going to used unipolar stepper motor rather than bipolar stepper motor. The unipolar motor is 5VDC gear stepper motor.


ULN2003 STEPPER MOTOR AND 5VDC STEPPER MOTOR


Pin Definition of ULN2003


Circuit diagram


WEEK 1


For the first week, I am going to verify the progress of FYP 1 to FYP 2 by checking all the component and equipment that going to be used for FYP 2. There are some component circuit that need to be changed in order to progress the FYP 2. By this week, the schedule of FYP 2 is being checked so the planner that been made before is on schedule.


FYP 1 Gant chart


FYP 2 Gant chart